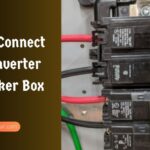
How to Connect Solar Inverter to House: A Step-by-Step Guide
To connect a solar inverter to your house, you need to follow a few simple steps. First, check your system’s compatibility and ensure you have the necessary equipment.
Then, connect the DC output from your solar panels to the DC input of the inverter. Finally, connect the AC output of the inverter to your house’s electrical system. By following these steps, you can easily connect your solar inverter to power your home with clean, renewable energy.
Solar power is becoming an increasingly popular and eco-friendly option for homeowners looking to reduce their reliance on traditional electricity sources. By harnessing the sun’s energy, solar panels can generate electricity that can be used to power your home. However, to make the most of this renewable energy source, you need to know how to connect your solar inverter to your house. This crucial step allows the DC power generated by your solar panels to be converted into AC power, which can then be used to run your household appliances and electronics. We will guide you through connecting your solar inverter to your house, so you can start enjoying the benefits of solar energy efficiently and effectively.
Selecting The Right Location For The Solar Inverter

When it comes to connecting a to connect solar inverter to house, selecting the right location is crucial for optimal performance and safety. Considering factors such as accessibility, ventilation, and safety precautions will help ensure that your solar inverter functions efficiently and seamlessly integrates with your home’s electrical system.
Accessibility
Accessibility is an important factor to consider when choosing the location for your solar inverter. It should be placed in a spot that allows for easy access during installation, maintenance, and troubleshooting. Ideally, the location should be reachable without the need for ladders or other equipment, making it convenient for technicians to work on the inverter when required. Additionally, placing the inverter in a well-accessible area will reduce the risk of accidental damage or obstacles blocking its operation.
Ventilation
Ventilation plays a crucial role in ensuring the longevity and efficiency of your solar inverter. It is important to select a location with good airflow to prevent the inverter from overheating. While some inverters are designed to handle high temperatures, it is still advisable to place them in a well-ventilated area to maintain optimal performance. Avoid areas with excessive heat or direct sunlight, such as attics or cramped spaces without proper air circulation. This will not only protect the inverter but also contribute to its seamless operation.
Safety Precautions
Safety should always be a top priority when selecting the location for your solar inverter. Install the inverter in an area that minimizes the risk of accidents or damage to the unit. Keep it away from sources of water, such as pipes or leaking roofs, to prevent any electrical hazards. Additionally, ensure that the chosen location provides ample space around the inverter for air to circulate freely, avoiding any potential fire hazards. Adequate spacing will also allow technicians or electricians to work comfortably around the unit during installation and maintenance.
| Do: | Don’t: |
| Install the inverter in a dry area. Could you keep it away from water sources?Ensure there is ample space for airflow and cooling. | Install the inverter in a dry area. Could you keep it away from water sources? Ensure there is ample space for airflow and cooling. |
By considering factors such as accessibility, ventilation, and safety precautions during the selection of the location for your solar inverter, you can ensure optimal performance and longevity of your system. Remember that consulting with a professional solar installer or electrician is always recommended to ensure that your solar inverter is connected safely and efficiently to your house.
Preparing The Electrical Connections
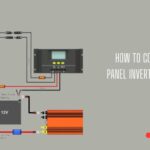
When it comes to connecting a solar inverter to your house, preparing the electrical connections is a crucial step that should not be overlooked. This involves gathering the necessary tools and equipment, understanding the solar inverter’s wiring diagram, installing the DC disconnect and surge protection devices, and finally, connecting the solar panels to the inverter.
How Long Does Solar Inverter Last
Gathering The Necessary Tools And Equipment
In order to properly connect your solar inverter to your house, you will need to gather a few essential tools and equipment. Here is a list of what you will need:
| Tools | Equipment |
| Insulated screwdriver setWire cutters/strippersWire crimpers, multimeters, and electrical tape | Solar inverterDC disconnect switchSurge protection devicesMounting bracketsCable glands |
Understanding The Solar Inverter’s Wiring Diagram
Before you start with the actual installation, it’s important to have a clear understanding of the wiring diagram of your solar inverter. This diagram provides a visual representation of how the various components should be connected. Make sure to study the diagram carefully to avoid any potential mistakes or errors.
Installing The DC Disconnect And Surge Protection Devices
The next step is to install the DC disconnect switch and surge protection devices. The DC disconnect switch acts as a safety mechanism that allows you to shut off the flow of electricity from the solar panels to the inverter in case of an emergency. Surge protection devices, on the other hand, protect your solar inverter and other electrical components from power surges or voltage spikes.
To install the DC disconnect switch, follow these steps:
- Locate a suitable location near the electric service panel and solar inverter to mount the disconnect switch.
- Using appropriate tools, carefully cut a hole in the wall or surface for the switch.
- Connect the switch to the existing electrical wiring, following the manufacturer’s instructions.
- Securely mount the switch in place.
As for the surge protection devices:
- Choose a location near the solar inverter to mount the devices.
- Connect the surge protection devices to the corresponding terminals of the inverter, following the manufacturer’s instructions.
- Ensure the devices are securely mounted.
Connecting The Solar Panels To The Inverter
Now that you have installed the necessary components, it’s time to connect the solar panels to the inverter. Follow these steps:
- Identify the positive and negative terminals on the solar panels.
- Using appropriate tools, strip the insulation from the solar panel cables.
- Connect the positive cable from each solar panel to the positive terminal on the inverter.
- Connect the negative cable from each solar panel to the negative terminal on the inverter.
- Ensure all connections are tight and secure.
Congratulations! You have successfully prepared the electrical connections for your solar inverter. The next steps will involve configuring the inverter and connecting it to your house’s electrical system. Stay tuned for the next section of this guide.
Connecting The Inverter To The Ac Electrical System
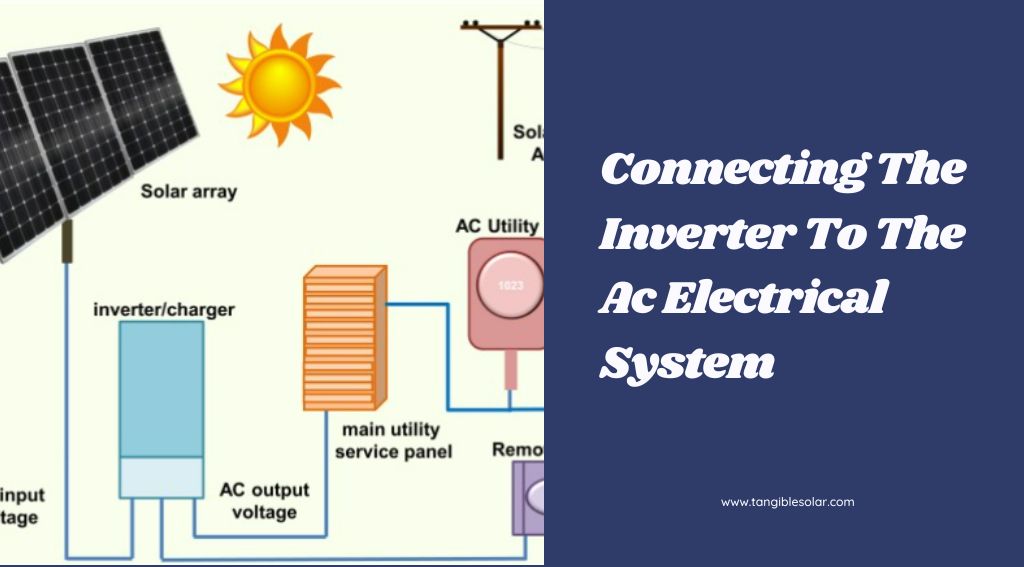
Connecting the Inverter to the AC Electrical System
When it comes to connecting a to connect solar inverter to house, one of the most crucial steps is linking it to the AC electrical system. This process ensures that the inverter can convert the DC power from the solar panels into usable AC power that can be utilized in your home. In this section, we will guide you through the necessary steps involved in connecting the inverter to your AC electrical system.
How Long Does a Solar Inverter Last
The Inverter’s AC Output Connections
To successfully connect your solar inverter to the AC electrical system, you first need to understand the inverter’s AC output connections. Generally, there are two types of output connections: single-phase and three-phase. Single-phase inverters are more common in residential installations, while three-phase inverters are typically used in commercial setups. These connections correspond to the different types of electrical systems in your house:
- Single-phase connection: Suitable for properties with a single-phase electrical supply. This setup includes two hot wires (+ and -) and a neutral wire.
- Three-phase connection: Applicable to properties with a three-phase electrical supply. This setup consists of three hot wires and a neutral wire.
It’s essential to determine the type of electrical supply you have in order to make the correct AC output connections from the inverter to your house.
The AC Disconnect And Grid-tie Connection
Once you have a clear understanding of the inverter’s AC output connections, the next step is to install the AC disconnect and establish the grid-tie connection. The AC disconnect acts as a safety measure, allowing you to disconnect the inverter from the grid whenever required. Follow these steps:
- Locate a suitable location near the inverter to install the AC disconnect box.
- Ensure the AC disconnect is rated appropriately for your system’s specifications.
- Connect the AC output wires from the inverter to the input terminals of the AC disconnect.
- Connect the output terminals of the AC disconnect to the grid-tie connection point.
- Double-check all connections and tighten them securely.
By properly installing the AC disconnect and grid-tie connection, you create a safe and reliable link between your inverter and the AC electrical system.
The Electrical Connections
Once the AC disconnect and grid-tie connection are in place, it is crucial to thoroughly test the electrical connections before relying on solar power. This step ensures that all connections are properly established and minimizes the risk of any potential issues. Here are some essential tests to conduct:
- Test the voltage across the AC output wires from the inverter to ensure it aligns with the expected voltage for your electrical system.
- Test the integrity of the neutral wire connection and make sure it has a proper grounding.
- Use an electrical tester to check the continuity of all connections, ensuring that there are no loose or faulty connections.
Testing the electrical connections is a crucial final step in the process of connecting your inverter to the AC electrical system. It guarantees the smooth and efficient operation of your solar power system.
Configuring And Setting Up The Solar Inverter
Configuring and setting up your solar inverter is a crucial step in successfully integrating it with your house’s electrical system. Understanding the inverter’s user manual and settings, adjusting settings for optimal performance and efficiency, and testing and monitoring the solar inverter are essential tasks that need to be carried out.
Understanding The Inverter’s User Manual And Settings
Before proceeding with the configuration process, it is vital to thoroughly understand the inverter’s user manual and settings. The user manual provides comprehensive information on how to operate and configure the inverter accurately. It contains detailed instructions on the inverter’s installation, maintenance, troubleshooting, and safety guidelines.
Take your time to read through the user manual, paying particular attention to the sections outlining the different settings and their functions. Familiarize yourself with the terminology and any specific terminology peculiar to your inverter model. Understanding the user manual will enable you to optimize the inverter’s performance and avoid potential issues that may arise due to incorrect settings.
Adjusting Settings For Optimal Performance And Efficiency
Once you have a good grasp of the inverter’s user manual and settings, it’s time to adjust the settings to ensure optimal performance and efficiency. Depending on your specific requirements and preferences, you may need to make changes to parameters such as voltage, frequency, and grid connection settings.
To adjust the settings, follow the step-by-step instructions provided in the user manual. It’s crucial to make changes with caution and adhere to any safety instructions provided by the manufacturer. By fine-tuning the settings, you can maximize the energy output, minimize losses, and ensure that your solar inverter seamlessly integrates with your home’s electrical system.
Testing And Monitoring The Solar Inverter
Testing and monitoring the Connect Solar Inverter to House is an ongoing process that helps ensure its smooth operation and identify any issues promptly. Regularly monitor the inverter’s performance and keep an eye out for indicators such as error codes or unusual behavior.
One way to monitor the inverter is by utilizing the built-in monitoring system, if available. This system provides real-time data on the inverter’s output, allowing you to track its performance and diagnose any potential problems. Additionally, you can consider using third-party monitoring tools or software that offers more detailed insights and analysis.
Don’t forget to perform periodic tests to verify the inverter’s functionality. During these tests, check if the inverter is accurately converting sunlight into usable electricity and ensure that the power is being efficiently distributed throughout your home’s electrical system.
By understanding the user manual and settings, adjusting them accordingly, and properly testing and monitoring the solar inverter, you can ensure optimal performance, efficiency, and longevity of your solar power system.
Common Issues With Solar Inverter Connections
Connecting a solar inverter to your house is a crucial step in harnessing solar energy and enjoying the benefits of renewable power. However, it’s not uncommon to encounter issues during the connection process. In this section, we will cover the common issues that arise when connecting a solar inverter to a house, and provide practical solutions to help you overcome these challenges.
Identifying And Resolving Connection Problems
A successful connection between your solar inverter and to house requires careful attention to detail. If you are experiencing connection issues, it’s important to identify and resolve them promptly. Here are some common problems you may encounter:
- Incompatible connectors or cables: One of the major causes of connection problems is the use of incompatible connectors or cables. Make sure that the connectors and cables you are using are compatible with both the inverter and your house’s electrical system.
- Poor connection quality: Loose connections or inadequate contact can lead to intermittent power supply or even system failure. Ensure that all connections are secure and properly tightened. Use high-quality connectors and cables to guarantee a reliable and stable connection.
- Incorrect polarity: Connecting cables with opposite polarities can cause severe damage to your solar inverter and other connected devices. Always double-check the polarity of the connections before powering up the system.
- Faulty circuit breakers or fuses: Faulty circuit breakers or fuses can disrupt the flow of electricity between the solar inverter and your house’s electrical network. Regularly inspect and test the circuit breakers and fuses to ensure they function properly.
- Interference from other electrical devices: Sometimes, the operation of other electrical devices in your house can interfere with the performance of your solar inverter. Identify and eliminate any sources of interference, such as faulty appliances or poor wiring.
Consult the installation manual that your solar inverter manufacturer has provided to resolve these connection issues. It will provide detailed instructions on troubleshooting steps and best practices for ensuring a successful connection.
Ensuring Proper Grounding And Wiring
Proper grounding and wiring are crucial for the safe and efficient operation of your solar inverter. Here are some key considerations:
- Grounding: Ensure that your solar inverter is grounded according to local electrical codes and regulations. Proper grounding protects against electrical shocks and helps dissipate excess energy, safeguarding your solar system.
- Wiring: Use high-quality, rated wiring to connect your solar inverter to your house’s electrical system. Improper wiring can lead to voltage drops, power losses, and increased fire risks. Follow the recommended wire gauge and proper wire management techniques for a reliable and efficient connection.
- Protection devices: Install appropriate protection devices, such as surge protectors and disconnect switches, to safeguard your solar inverter and connected devices from electrical surges and faults.
- Regular maintenance: Regularly inspect and maintain your solar inverter’s grounding and wiring system to ensure its integrity and optimal performance. Check for any loose connections, damaged wires, or corrosion, and address these issues promptly.
By paying close attention to grounding and wiring considerations, you can minimize the risk of electrical hazards and ensure that your solar inverter operates efficiently and safely.
Regular Maintenance And Care For Solar Inverters
Regular maintenance and care are essential to ensure the optimal performance and longevity of your solar inverters. By following a few simple maintenance practices, you can keep your solar inverters running efficiently and minimize the risk of potential issues. This section will cover two important aspects of regular maintenance and care: cleaning and inspecting the inverter and updating firmware and software.
1. Cleaning And Inspecting The Inverter
Keeping your solar inverter clean and free from debris is crucial for its performance. Regularly inspect and clean the inverter to prevent any accumulation of dirt, dust, or leaves. This will not only maintain its aesthetic appearance but also help in avoiding any potential damage or overheating.
To clean the inverter:
- Disconnect the inverter from the power source.
- Use a soft cloth or brush to gently remove any dust or dirt from the surface of the inverter.
- Avoid using harsh chemicals or abrasive materials that could cause damage.
- Inspect the inverter for any signs of wear, loose connections, or physical damage.
- Tighten any loose bolts or connections, if necessary.
2. Updating Firmware And Software
Regularly updating the firmware and software of your solar inverters is essential to ensure optimal performance and access to the latest features and improvements. It is recommended to check for updates periodically or whenever new versions become available.
To update the firmware and software:
- Check the manufacturer’s website or documentation for firmware/software updates specific to your solar inverter model.
- Download the latest firmware/software version onto your computer.
- Connect your computer to the inverter using the appropriate interface (USB, Ethernet, etc.).
- Follow the manufacturer’s instructions to install the updates onto the inverter.
- After the update is complete, restart the inverter to ensure the changes take effect.
By following these regular maintenance practices, you can ensure that your solar inverters stay in optimal condition and continue to generate clean and efficient energy for your home. Remember, consistency is key, so make it a habit to clean and inspect your inverters regularly and stay up-to-date with the latest firmware and software updates.
Frequently Asked Questions On How To Connect Solar Inverter To House
How Do I Connect A Solar Inverter To My House?
To connect solar inverter to house, you will need to install solar panels on your roof, mount the inverter near your main electrical panel, and connect the inverter’s DC wires to the solar panels and the AC wires to the breaker box.
It’s also recommended to hire a professional for safe installation.
Can I Connect Multiple Solar Inverters To My House?
Yes, you can connect multiple solar inverters to your house, especially if you have a large solar energy system. However, it’s essential to ensure that the total capacity of the inverters does not exceed the electrical capacity of your house.
Consulting with a professional installer is advisable to determine the best setup for your specific needs.
What Is The Cost Of Connecting A Solar Inverter To A House?
The cost of connecting a solar inverter to a house depends on various factors, including the size of your solar energy system, the type and quality of the inverter, and the complexity of the installation. On average, the cost can range from $2,000 to $10,000.
It’s recommended to obtain quotes from different installers to get an accurate estimate for your specific requirements.
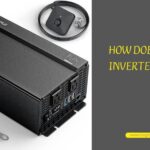
How Does A Solar Inverter Work?
A solar inverter converts the DC (direct current) electricity generated by solar panels into AC (alternating current) electricity that can be used in your house. It regulates the voltage and frequency of the electricity to match the utility grid, enabling seamless integration between your solar energy system and the electrical supply in your house.
Conclusion
Connecting a solar inverter to your house is a straightforward process that can bring significant benefits. By harnessing the power of the sun, you can reduce your carbon footprint and save money on your energy bills. Remember to follow the manufacturer’s instructions, hire a professional if needed, and ensure proper safety precautions.
So, go ahead and embrace renewable energy with confidence as you embark on this eco-friendly journey.