How to Draw a Solar Panel: Master the Art of Renewable Energy
How to Draw a Solar Panel Begin by drawing a square or rectangular shape to represent a solar panel. After that, cut it into smaller portions and add lines or hatches to represent the solar cells.
Understanding How to Draw a Solar Panel
Solar energy is a renewable source of energy that generates electricity by harnessing the sun’s rays. The relevance of solar energy to satisfying our energy needs develops in tandem with the desire for clean and sustainable energy. In this section, we will look at the basics of solar energy, from its description to its importance and how solar panels work.
What exactly is solar energy, and why is it so important?
The conversion of sunlight into useful electricity is referred to as solar energy. It is abundant, free, and emits no harmful emissions, making it an environmentally preferable alternative to fossil fuels. We can minimize our carbon footprint, tackle climate change, and create a cleaner and greener future for future generations by embracing this renewable energy source.
How do solar panels function?
Solar panels are the backbone of any solar power setup. Direct current (DC) electricity is produced using photovoltaic (PV) cells, which are used in these devices. Here’s a quick rundown of how solar panels work:
- The PV cells absorb the photons when sunlight strikes the solar panels.
- The absorbed energy excites the electrons within the PV cells, resulting in an electron flow.
- The flow of electrons results in an electrical current.
- An inverter then converts the generated direct current (DC) electricity into alternating current (AC) electricity.
Home, commercial, and other electrical gadgets can all be powered by alternating current electricity.
It’s vital to remember that how to draw a solar panel works best when it’s exposed to direct sunlight. The angle and position of the panels, as well as environmental elements such as shading and temperature, can all have an effect on their efficiency.
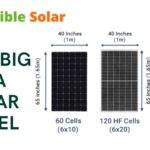
Investigating the various types of solar panels available
There are various varieties of solar panels available, each with its own set of benefits and drawbacks. The most prevalent types are as follows:
Budget, available space, and desired efficiency are some factors determining the best type of solar panel. Consultation with a solar energy professional can assist you in determining the best alternative for your individual needs.
Finally, understanding the fundamentals of solar energy is critical to completely comprehending the benefits and operation of solar panels. Solar energy is an important component in the search for sustainable power sources since it provides a cleaner and more environmentally friendly alternative to typical energy-producing methods.
Getting Ready for the Drawing Process
Before you start the exciting process of drawing a solar panel, make sure you’re adequately equipped. Gathering the appropriate equipment and supplies, taking precise measurements, and comprehending the various components of a solar panel are all important aspects of making a successful drawing. In this section, we’ll go over each of these points in depth, giving you the knowledge and practicalities you need to construct a precise and accurate solar panel drawing.
Obtaining the required tools and materials:
To begin your solar panel drawing quest, acquire a few necessary pieces of equipment and materials. Here is a list of what you will require:
You are now ready to proceed to the next step after gathering these tools and resources.
Taking precise panel measurements:
- Now that you’ve assembled your tools and materials, it’s time to take precise measurements of the solar panel. This is an important stage in generating a detailed and proportionate drawing. Here’s how you can do it:
- Lay your drawing paper level and stable, such as on a drawing board.
- Using a ruler, draw a straight line to depict the solar panel’s foundation.
- Using a ruler, properly measure the length and breadth of the solar panel and record these measurements.
- Make your dimensions on drawing paper, making sure they are proportionate to the scale you’ve chosen.
- For future reference, label the measurements on your drawing.
- By acquiring precise measurements, you lay the groundwork for a precise and realistic drawing.
Understanding the various solar panel components:
Before you begin designing a solar panel, it’s critical that you grasp its numerous components. This understanding will assist you in creating an appropriate portrayal. The principal components of a solar panel are as follows:
- Solar cells: These are the devices that transform sunlight into electricity.
- Frame: The frame supports and protects the solar cells structurally.
- Backsheet: This layer protects the solar cells from moisture, heat, and other external variables.
- Junction Box: This is the location where electrical connections are formed and protected.
- Glass Cover: The glass cover allows sunlight to enter while protecting the inside components.
Understanding these components will allow you to portray them accurately in your solar panel drawing.
Now that you’ve acquired the essential tools and supplies, taken accurate measurements, and become acquainted with the various components, you’re ready to begin the drawing process. In the following part, we will walk you through the step-by-step process of bringing your solar panel drawing to life!
Creating a Solar Panel Design
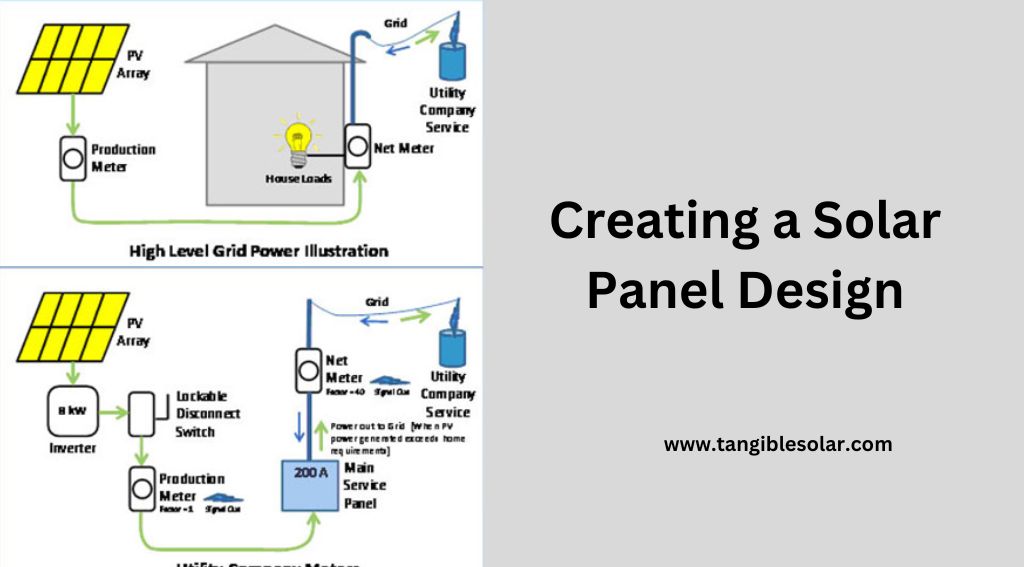
Sketching the solar panel design is an important step in constructing a practical and visually appealing solar panel system. You may imagine how the panel will look and verify that all relevant components are included by producing a comprehensive sketch. In this section, we will go over the procedures involved in drawing the How to Draw a Solar Panel design, beginning with a crude sketch of the panel layout, progressing to producing accurate lines and angles, and adding critical elements like electrical connections and mounting points.
To begin, make a rough sketch of the panel layout:
Create a rough draft of the panel layout as the initial stage in sketching the solar panel design. This first sketch helps to define the overall shape and size of the panel, as well as the location of critical components like solar cells and wiring connections.
To begin, sketch the basic shape of the solar panel with a pencil and a sheet of graph paper or a blank piece of paper. Pay close attention to the measurements and proportions to ensure that the sketch appropriately portrays the desired panel size. Keep in mind the available installation area as well as any unique requirements or limits when you create the basic draft.
Once you’ve created a rough concept of the panel layout, you may add additional detail and refine the design.
Making Perfect Lines and Angles:
Accurate lines and angles are essential for producing a precise and professional-looking solar panel design. To accomplish this, draw straight lines with a ruler or straightedge and ensure that the angles are clean and exact.
Pay close attention to the positioning of the solar cells, ensuring that they are evenly spaced and aligned. Draw lines to identify the location of each solar cell, and consider using shading to differentiate between specific cells or sections.
Draw lines using the ruler to indicate the wire connections between the solar cells. These lines should be straight and show the path of the electrical connections clearly.
Remember that precision is essential when generating precise lines and angles. Taking the time to double-check the lines and angles will result in a more polished and professional solar panel design.
Including particulars like electrical connections and mounting points:
It’s time to add vital elements to the sketch after you’ve generated the exact lines and angles for the basic design. These features include electrical connections and mounting locations, which are critical for the solar panel’s performance and installation.
To represent the electrical connections between the solar cells, draw lines or arrows. This will assist you in visualizing the wiring path and ensuring that the connections are appropriately made.
Mark the mounting locations on the sketch in addition to the electrical connections. These points specify where the panel will be mounted or installed, whether on a roof, a pole, or any other appropriate site. To distinguish the mounting points from other components, use a different symbol or color.
By including these crucial components in the sketch, you can ensure that the final solar panel design contains all of the parts required for proper installation and operation.
Increasing Dimension and Depth
When sketching a solar panel, adding dimension and depth can transform your work from a flat design into a visually appealing masterpiece. You may create a realistic and three-dimensional impression that will fascinate your audience by including shade and shadows, applying perspective techniques, and improving the design with texture and surface details.
Shading and shadowing to generate a three-dimensional effect:
Shadows and shading are important in giving your solar panel drawing depth and realism. You may create the illusion of things extending or receding by selectively adding shadows to specific places, resulting in a compelling three-dimensional effect. Consider the position of the light source and how it interacts with the panel’s surface when implementing shade and shadows. You can use this to decide where to place the highlights and shadows.
Using perspective techniques to make the panel appear more realistic:
Perspective techniques are necessary for making your How to Draw a Solar Panel appear genuine and credible. Using vanishing points and converging lines is one approach to accomplishing this. You may generate an accurate feeling of depth and spatial relationships by precisely aligning the parts of your drawing with these points and lines. Remember to examine the size and placement of things in your panel sketch to maintain an accurate perspective.
Adding texture and surface features to the design:
Don’t neglect the importance of texture and surface details in making your solar panel drawing visually appealing. Unique patterns, textures, and reflecting surfaces of solar panels can add interest to your artwork. Incorporate these elements by observing and replicating the panel’s intricate features, such as grooves, lines, and defects. You may improve the realism and general appeal of your drawing by paying attention to these minor but crucial aspects.
Remember that adding dimension and depth to your solar panel drawing necessitates a sharp eye for observation as well as knowledge of shading, perspective, and surface details. You can bring your solar panel artwork to life and leave a lasting effect on your audience with practice and attention to these approaches.
Highlighting and coloring
Choosing the Best Color Scheme for a Solar Panel:
Choosing the proper color palette is critical when it comes to coloring a solar panel. The colors you use can have a big impact on the overall look of your drawing. It is critical to consider the actual colors of a solar panel to achieve realism and authenticity. Dark blue or black cells encircled by a metallic frame make up the majority of solar panels.
Here are a few things to consider when selecting a color palette for your solar panel:
- Examine actual solar panels: Examine actual solar panels to obtain a sense of the colors utilized. Look for reference photographs on the internet or go to a solar panel installation. This will help you grasp the color and texture variances.
- Employ a limited color palette: Begin with a simple color palette and progressively add more tones and gradients. To keep a consistent and balanced aesthetic, stick to the primary colors and their variants.
- Consider the environment. Consider the solar panel’s surroundings. Is it installed on a roof or in a field? The colors in the environment can influence the color choices for shadows and highlights.
Creating Depth and Realism with Gradients and Shades
Drawing realistic solar panels requires the use of gradients and hues. They lend depth and dimension to the panel, making it appear more three-dimensional. This is how you can obtain the desired effect:
- Begin with the basic colors: Fill the solar panel cells and frame with their corresponding base colors first. Apply the colors uniformly with a brush or a color-fill tool.
- Add gradients: To create a sense of depth, apply gradients to the solar panel cells. Begin with a deeper shade of the base color at the edges and work your way to a lighter shade in the center.
- Add shades and shadows: Create shadows on the solar panel frame by using darker hues of the base color. Consider the light source’s direction and imagine where shadows would naturally fall.
- Blend and smooth: Use blending and smudging tools to blend the colors together seamlessly. This will result in a more seamless transition between the various hues and gradients.
Highlighting the Panel’s Important Features:
Highlighting is a vital step in drawing attention to a solar panel’s key features. This highlights its structure and functionality. Follow these procedures to effectively highlight the main features:
- Choose a lighter shade: To highlight specific portions of the solar panel, choose a lighter shade of the basic color. This will draw attention to those regions.
- Concentrate on the edges and corners: Use a lighter hue to highlight the edges and corners of the solar panel cells and frame. This creates the sense of light bouncing off the surface and gives the picture depth.
- Use sparingly: avoid overdoing the highlighting. Use it sparingly to prevent making the drawing look fake or excessive.
You may make a visually appealing and realistic picture of a solar panel by using the proper color palette, adding gradients and tints, and emphasizing the main aspects. Always practice and experiment with new techniques to improve your drawing abilities.
Drawing Completion
After you’ve spent time and effort drawing a solar panel, it’s critical to give your artwork a sense of completion. Finishing the drawing improves not only the general aesthetic but also adds a personal touch that makes it completely yours. In this section, we’ll go over the procedures you need to follow to finish your solar panel drawing. Let’s get started!
Cleaning up the lines and removing any extraneous marks:
After successfully capturing the delicate features of a solar panel, it’s time to clean up the lines and remove any extraneous blemishes. Take a fine eraser and gently go over the entire drawing, paying special attention to areas where there is excess graphite or stray lines. Erase these traces carefully, making sure that the essential characteristics of the How to Draw a Solar Panel are kept while removing any distractions that may detract from the overall composition.
Finishing tweaks and overall composition refinement:
Once the lines have been cleaned up, it’s time to add the finishing touches that will bring your solar panel drawing to life. Pay close attention to the shading and highlights, making sure they are well-balanced and effectively portray the play of light on the solar panel’s surface. Softly blend any rough edges with a blending stump or a cotton swab to create a smooth transition between different regions of the drawing. Take a step back and evaluate the overall makeup. Is there anything that needs to be improved or adjusted? Make the required adjustments to ensure that the drawing has a harmonious balance.
Signing and dating the artwork as a finishing mark:
Signing and dating your artwork is a technique to prove ownership as well as a mark of accomplishment. It adds a personal touch to your drawing and makes it truly one-of-a-kind. Sign your name in a small, unnoticeable area of the drawing. To ensure longevity, use a graphite pencil or a fine pen with archival ink. Don’t forget to include the date alongside your signature, as this will serve as a record of when you finished the artwork. You can proudly display your solar panel artwork, knowing that it is a finished masterpiece, if you sign and date it.
Displaying Your Solar Panel Design
When you’ve finished How to Draw a Solar Panel, it’s time to show it off to the rest of the globe! Sharing your artwork on social media platforms and online groups, receiving feedback, interacting with other renewable energy lovers, and pushing others to adopt solar power through your artistic creation are all important steps in displaying your solar panel drawing.
Using social media channels and online forums to share your artwork:
Sharing your solar panel drawing has never been easier because of the growing usage of social media platforms and online communities. There are numerous sites to promote your artwork, whether you like Facebook, Instagram, Twitter, or even dedicated art groups like DeviantArt.
Use relevant hashtags when sharing your drawing, such as #solardrawing, #renewableenergyart, or #artandenergy. This will allow your artwork to reach a larger audience that is interested in solar power and renewable energy.
Obtaining comments and interacting with other renewable energy enthusiasts:
One of the most exciting elements of displaying your solar panel drawing is the chance to interact with other renewable energy enthusiasts and get feedback on your work. Join relevant organizations or utilize specific hashtags to engage with like-minded folks in online communities or social media platforms.
Don’t be scared to solicit criticism or suggestions on How to Draw a Solar Panel drawing. Conversations will not only improve your artistic ability but will also create a forum for knowledge exchange and networking with those who share your enthusiasm for solar power.
Through your artistic effort, you can inspire others to adopt solar power.
Your drawing of a solar panel has the potential to inspire others to adopt solar energy and contribute to a more sustainable future. You can pique your audience’s interest in green energy by displaying your artwork.
Consider writing a captivating caption or description that explains why solar energy is important and how your artwork reflects its benefits. Share intriguing solar power facts or statistics to educate and persuade others to explore this clean and sustainable energy source.
Encourage others to draw their own How to Draw a Solar Panel or to participate in discussions on sustainable energy. You play an important role in raising awareness and encouraging positive change by initiating dialogue and boosting artistic expression.
Remember that each drawing is a one-of-a-kind opportunity to express yourself creatively and inspire others. Take pride in your solar panel drawing and proudly share it with the rest of the world!
Frequently Asked Questions How to Draw a Solar Panel
How many solar panels are necessary to power a house?
It depends on aspects such as energy consumption and panel efficiency, but typically, 20 to 25 solar panels are required to power a house.
Can I Construct My Own Solar Panel?
Yes, you can construct your own solar panel. You can acquire materials and assemble the necessary components by following directions and instructions. You can build a working solar panel for personal use with some basic knowledge and tools.
How Do You Make a Project Solar Panel?
Gather solar cells, a backing material, and connections to create a solar panel for a project. Arrange the solar cells on the supporting sheet, making sure they’re all aligned. Connect the cells with cables and cover them with a clear cover.
Finally, secure the solar panel to an appropriate stand or mounting platform.
How do solar panels produce energy?
Through the photovoltaic effect, solar panels generate power by converting sunlight into direct current (DC) electricity.
Conclusion
Drawing How to Draw a Solar Panel does not have to be difficult. You can construct a thorough and accurate representation by following these simple steps. The process is both creative and informative, from defining the basic design to adding precise details.
By taking on this do-it-yourself project, you may learn more about how solar panels function and contribute to the growing popularity of renewable energy. So grab a pencil, channel your inner artist, and bring the force of the sun to your work.
Have fun sketching!