How to Make a Solar Panel With Aluminum Foil: Step-by-Step Guide to Harnessing Solar Power
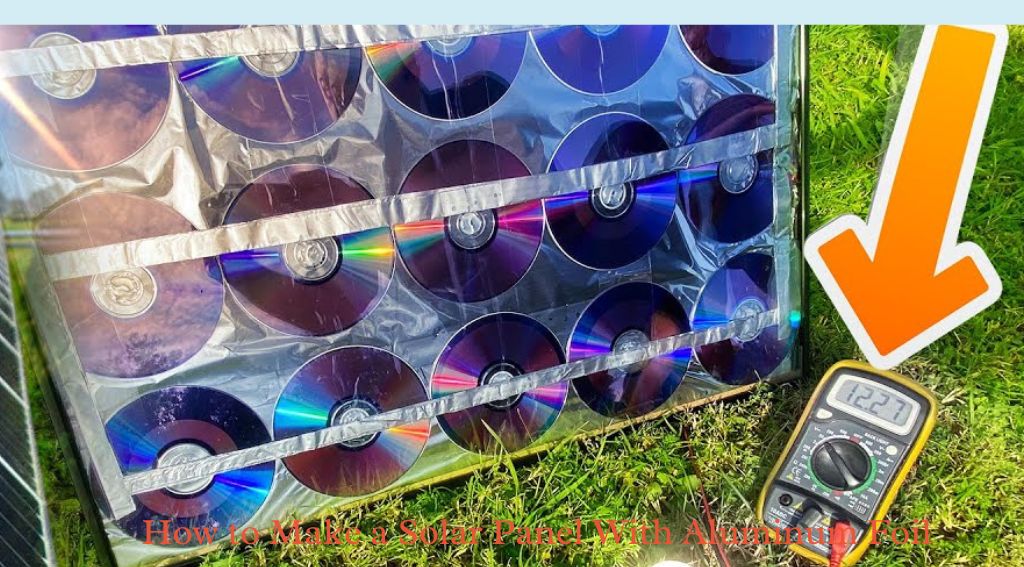
To make a solar panel with aluminum foil, gather foil, solar cells, and a soldering iron. Arrange cells on the foil, connecting them in series, then seal with another layer of foil.
Creating a solar panel with aluminum foil is a straightforward process that can be done at home with minimal materials. By following simple steps and using basic tools like a soldering iron, you can harness solar energy for various purposes.
We will guide you through the process of making a DIY solar panel using aluminum foil, providing you with practical tips and insights to help you succeed in your renewable energy endeavor. Whether you are a beginner or a DIY enthusiast, this project offers a cost-effective and eco-friendly way to generate electricity using sunlight.
Materials Needed
To make a solar panel with aluminum foil, you will need some basic materials, like a sheet of aluminum foil, a sheet of glass, a solar cell, and some silicone sealant. These materials are essential for the process of creating a DIY solar panel, providing the necessary components for harnessing solar energy.
Aluminum Foil
Aluminum foil is a crucial component in creating a DIY solar panel. It acts as the substrate on which the solar cells are mounted.
Solar Cells
Solar cells are the heart of the solar panel, responsible for converting sunlight into electricity. Typically made of silicon.
Soldering Iron
A soldering iron is needed to connect the solar cells to form a functional solar panel. It helps in creating secure connections.
Soldering Wire
The soldering wire is used with the soldering iron to join the solar cells securely, ensuring a strong and durable connection.
Silicone Sealant
Silicone sealant is utilized to weatherproof the solar panel and protect the electrical components from moisture and external elements.
Preparing The Solar Cells
Inspecting the Solar Cells: Begin by closely examining each solar cell for any damages.
Soldering the Solar Cells Together: Connect the solar cells in a series using a low-heat soldering iron.
Applying Silicone Sealant: Seal the connected solar cells with silicone sealant to protect them from moisture.
Creating The Panel Frame
When it comes to creating a solar panel with aluminum foil, one of the crucial steps is constructing the panel frame. This frame is essential for holding the aluminum foil sheets in place and providing structural support for the panel. In this guide, we will walk you through the vital steps for creating the panel frame.
Cutting Aluminum Foil Sheets
To begin, cut the aluminum foil sheets to the desired size for your solar panel. The sheets should be cut with precision to ensure they fit within the dimensions of the panel frame. Use a sharp pair of scissors or a utility knife to make clean, straight cuts. Take care to avoid wrinkles or tears in the foil, as these imperfections can affect the efficiency of the solar panel.
Assembling The Frame
Next, assemble the frame using sturdy materials such as wood or metal. Measure and cut the frame pieces to match the dimensions of the aluminum foil sheets.
Ensure that the frame is perfectly square to provide a secure fit for the foil. Use screws or adhesive to securely join the frame pieces together, creating a rigid structure that will hold the aluminum foil in place.
It’s essential to check for any gaps or misalignments in the frame, as these can lead to inefficiencies in the solar panel.

Credit: Wikihow
Assembling The Panel
Once you have gathered all the necessary materials for your DIY solar panel, it’s time to start assembling it. This step-by-step guide will walk you through the process of attaching the solar cells to the frame, ensuring that your panel is securely put together.
Attaching The Solar Cells To The Frame
The solar cells are the heart of your panel, as they convert sunlight into electricity. To attach them to the frame, follow these simple steps:
- Carefully position the solar cells on the frame, ensuring they are aligned and evenly spaced.
- Once the cells are in place, use a strong adhesive to secure them to the frame. Be sure to apply the adhesive evenly and avoid using excessive amounts.
- Next, connect the cells using a tabbing wire. This wire should be soldered onto the bus wire of each cell, creating a series connection. Avoid applying too much heat during the soldering process to prevent damaging the cells.
- After the series connection is complete, cover the soldered connections with silicone adhesive or tape to protect them from moisture and other environmental factors.
- Finally, carefully position the assembled solar cells onto the frame and secure them in place using screws or mounting brackets. Ensure that the cells are firmly attached to the frame to avoid any movement or damage.
By following these steps, you can easily assemble your solar panel using aluminum foil. The process might seem intimidating at first, but with a little patience and attention to detail, you can create a functional and cost-effective solar panel to harness the power of the sun.
Connecting The Panel
To connect the panel, begin by laying out solar cells on a sheet of aluminum foil. Link them with tabbing wire, ensuring smooth connections. Cover with a second foil sheet and sandwich the cells. Secure the edges with tape, leaving terminals accessible for wiring.
Connecting the Panel:
To connect the solar cells in your panel, you will first need to attach wires to them. This is a crucial step in ensuring that the electricity generated by the cells can be properly harnessed and utilized. It might sound complicated, but with a little patience and attention to detail, you’ll have the wires securely connected in no time.
Here’s a step-by-step guide on how to attach wires to the solar cells:
1. Start by soldering one end of a wire to the positive terminal of a solar cell, ensuring a strong connection between the wire and the terminal.
2. Repeat the same process for the negative terminal of the solar cell, soldering the other end of the wire securely.
3. Once you’ve soldered the wires to the first solar cell, move on to the next one in the panel and repeat the process, making sure to connect the positive terminal of one cell to the negative terminal of the next. This will create a series connection, allowing the electricity to flow smoothly from one cell to another.
4. Keep repeating this step until all the solar cells in the panel are connected in series.
Remember to handle the solar cells with care and avoid touching the front side, where the light is absorbed. By following these steps, you will have successfully attached wires to the solar cells, laying a solid foundation for the functioning of your homemade solar panel.
Connecting to a Charge Controller
Once you have successfully attached the wires to the solar cells, the next step is to connect your panel to a charge controller. This device plays a crucial role in regulating the flow of electricity from your solar panel to the battery or system you want to charge. It protects your battery from overcharging and ensures efficient energy transfer.
Follow these steps to connect your solar panel to a charge controller:
1. Identify the positive and negative terminals on the charge controller.
2. Connect the positive wire from your solar panel to the positive terminal of the charge controller, making sure it is securely attached.
3. Similarly, connect the negative wire from your solar panel to the negative terminal of the charge controller, ensuring a tight connection.
4. If your charge controller has additional terminals, you may need to connect other wires based on the specific instructions provided by the manufacturer. This might include connections for battery terminals or load terminals.
By properly connecting your solar panel to a charge controller, you can ensure the optimal performance and longevity of your solar power system. Now that the panel is connected, you are one step closer to harnessing the power of the sun and enjoying the benefits of your homemade solar panel.
Remember, each step in the process is crucial for the successful operation of your solar panel. Take your time, pay close attention to the directions, and you’ll soon be able to use your homemade solar panel to generate clean, renewable energy.
Credit: Hgtv
Frequently Asked Questions On How To Make A Solar Panel With Aluminum Foil
How Can I Make a Solar Panel with Aluminum Foil at Home?
To make a solar panel with aluminum foil, you will need materials such as plywood, solar cells, tabbing wire, flux, and, of course, aluminum foil. Follow the steps of cutting, soldering, and connecting the solar cells, then assemble them onto the plywood.
Next, cover the surface with aluminum foil and secure it. Finally, you can attach wires to the solar panel to connect to a battery or device.
Is it Possible to Generate Electricity Using Aluminum Foil?
Yes, it is possible to generate electricity using aluminum foil. Aluminum foil can act as a conductor when connected to a power source or solar cells. By creating a circuit and allowing current to flow through the foil, you can generate electricity.
However, it is essential to follow proper safety guidelines and precautions while working with electricity.
What Are the Advantages of Using Aluminum Foil in Solar Panels?
Aluminum foil offers several advantages when used in solar panels. It is lightweight, making it easier to handle and install. Additionally, aluminum foil is flexible and can be shaped to fit various surfaces, increasing design possibilities. Moreover, it is a cost-effective option compared to other materials and can help improve the efficiency of solar panels.
Conclusion
Creating a solar panel with aluminum foil is a feasible and cost-effective option for those who want to harness solar energy. By following the step-by-step guide in this blog post, you can contribute to the shift toward sustainable energy and reduce your reliance on traditional power sources.
Embracing solar power is a step in the right direction for a greener and more sustainable future.