How to Repair Solar Lights? Simple Steps to Brighten
To repair solar lights, start by checking the solar panels for any dirt or debris that could obstruct sunlight. Then, replace any faulty or worn-out batteries and bulbs.
Additionally, test the circuits and connections for any loose or damaged wires and repair or replace them as needed. Regularly cleaning and maintaining your solar lights can extend their lifespan and ensure optimal performance.
Understanding Common How to Repair Solar Lights?
Discovering common issues with solar lights is crucial to effectively repair them. By understanding the causes behind these problems, you can easily troubleshoot and fix your solar lights, ensuring they work efficiently and effectively.
Dissecting The Anatomy Of Solar Lights
Solar lights have a relatively simple yet efficient design that allows them to harness the power of the sun and illuminate outdoor spaces. Understanding the different components of solar lights can help you troubleshoot any issues you may encounter. Here’s a breakdown of the anatomy of solar lights:
- Solar Panel: Acts as the light’s power source by converting sunlight into energy.
- Battery: Stores solar panel energy for use when the sun is not available.
- LED Bulb: Emits light using the energy stored in the battery.
- Photocell: Automatically detects ambient light levels and triggers the light to turn on and off.
- Sensor: Activates the light when motion is detected nearby, increasing energy efficiency.
- Controller: Regulates the charging and discharging of the battery to optimize performance.
Understanding how each component works together will give you a better grasp of common issues that may arise with solar lights.
Identifying Common Problems In Solar Lights
Solar lights are dependable and eco-friendly, but like any technology, they can experience certain problems. Here are some common issues you might encounter with your solar lights:
How to Restore Solar Light Panels
- Dim or flickering light: This may indicate a problem with the battery or a faulty connection.
- Battery Not Charging: If your solar lights don’t seem to be charging, it could be due to a malfunctioning solar panel or a worn-out battery.
- Short Battery Life: This may be a result of an old or defective battery that needs replacement.
- Water Damage: Excessive exposure to moisture or rain can harm the internal components of solar lights, leading to malfunction.
- Poor Sensor Performance: If the motion sensor is not detecting movement accurately, it could be due to faulty wiring or a misaligned sensor.
- Faulty Wiring Connections: Loose or damaged wiring connections can hinder the flow of electricity, causing performance issues.
By identifying these common problems, you can take the necessary steps to troubleshoot and repair your solar lights effectively.
Troubleshooting Solar Light Performance
When your solar lights aren’t performing as expected, troubleshooting the issue can help restore their functionality. Here are some troubleshooting tips to get your solar lights working optimally:
- Check Solar Panel Position: Ensure that the solar panel is properly positioned to receive maximum sunlight throughout the day.
- Clean the Solar Panel: Dust, dirt, or debris can hinder the efficiency of the solar panel. Regularly clean it using a soft cloth to maintain optimal performance.
- Inspect Battery Connections: Ensure that the battery connections are secure and free of corrosion. Tighten loose connections and clean up any signs of rust or buildup.
- Replace the Battery: If your solar lights have been used for an extended period, the battery may need replacement. Look for a compatible replacement and install it following the manufacturer’s instructions.
- Inspect for Water Damage: Examine the light for any signs of water damage, such as rust or corrosion. If any damage is found, dry the light thoroughly and consider sealing any vulnerable areas with silicone.
- Check Sensor Alignment: Ensure that the motion sensor is properly aligned and free from any obstructions or debris that may interfere with its functionality.
By troubleshooting these common issues, you can restore your solar lights’ performance and enjoy their eco-friendly illumination once again. Remember, maintaining regular cleaning and inspections will help prevent potential problems in the future.
Replacing Faulty Solar Light Components
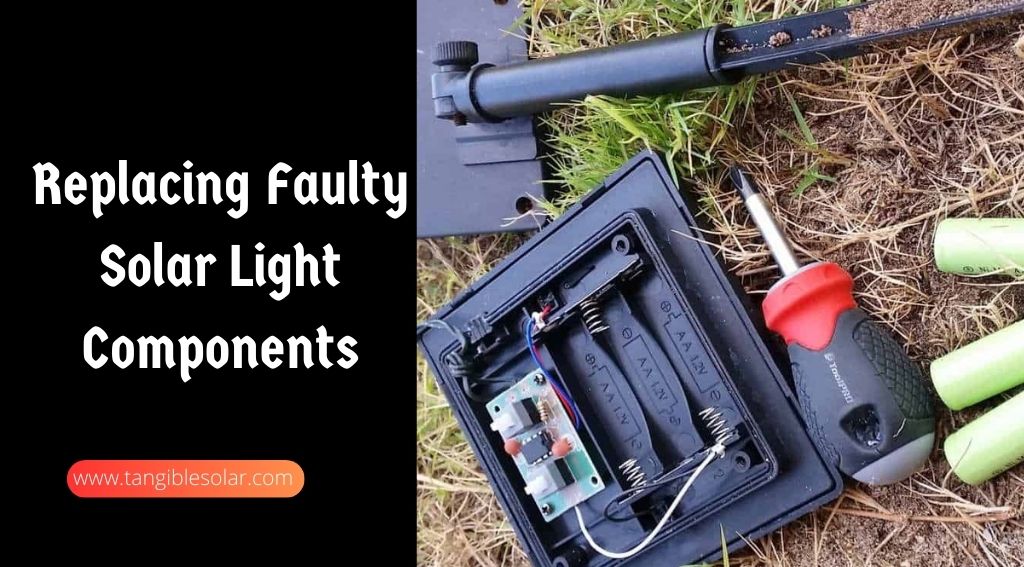
Learn how to repair faulty solar lights by replacing the malfunctioning components. This easy guide will help you restore your solar lights to their full functionality, saving you money and reducing waste.
Solar lights are an excellent way to illuminate your outdoor space while saving on energy costs. However, just like any other electrical device, they can encounter issues over time. If your solar lights are not functioning correctly, there are a few components you can assess and replace to get them back up and running efficiently.
In this section, we will explore the steps to replace faulty solar light components, focusing on assessing the solar panel and battery, swapping out damaged LED bulbs, and upgrading your solar light circuit board.
Assessing the Solar Panel and Battery:
To ensure optimal performance, it’s crucial to start by examining the solar panel and battery of your solar lights. Here’s how you can assess them:
- Check the solar panel for any signs of physical damage, such as cracks or loose connections. If you notice any issues, consider replacing the solar panel.
- Inspect the battery to see if it’s securely connected and free from corrosion. Corroded terminals can hinder the charging process and affect the overall performance of the solar light. Use a brush or cloth to clean the terminals gently.
- If you suspect that the battery is not holding a charge, consider replacing it with a new one. Make sure to choose a battery that is specifically designed for solar lights.
Swapping Out Damaged LED Bulbs:
If your solar light’s LED bulbs are not lighting up or are flickering, it might be time to replace them. Here’s how you can do it:
- Begin by identifying how the LED bulbs are attached to the solar light. Some models have removable bulbs, while others require more intricate disassembly.
- Once you have access to the LED bulbs, carefully remove the damaged ones by twisting or pulling them out, depending on the design. Take note of the bulb’s size and style before purchasing replacements.
- Install the new LED bulbs by inserting them firmly into their designated slots, ensuring a secure connection. Double-check that they are properly aligned and seated.
- After replacing the LED bulbs, test the solar lights to ensure they are working correctly. If the issue persists, it might be necessary to assess other components.
Upgrading Your Solar Light Circuit Board:
Upgrading the solar light circuit board can be a more advanced step, but it can significantly enhance the performance of your solar lights. Here’s what you need to know:
- Research the specific model of your solar light to determine if it has an upgradeable circuit board. Not all solar lights offer this option.
- Contact the manufacturer or search online for compatible circuit board upgrades. Make sure to choose one that matches your solar light’s specifications.
- Before replacing the circuit board, disconnect the solar panel and battery, ensuring your safety during the process.
- Carefully remove the existing circuit board and install the new one by following the provided instructions. Take note of the connections and wiring configurations to avoid errors.
- Once the new circuit board is securely installed, reconnect the solar panel and battery. Test the solar lights to evaluate their improved performance.
By assessing the solar panel and battery, swapping out damaged LED bulbs, and potentially upgrading the circuit board, you can effectively repair your solar lights and extend their lifespan. Remember to follow the specific instructions for your solar light model and prioritize safety while working with electrical components.
With these steps, you’ll be able to enjoy the benefits of well-functioning solar lights in your outdoor space for many evenings to come.
Maintaining And Cleaning Solar Lights For Longevity
To ensure the longevity of your solar lights, it is important to properly maintain and clean them. Regularly check for any damages and replace the necessary parts. Cleaning the solar panels and removing any debris will optimize their performance and increase their lifespan.
Solar lights are a great addition to any outdoor space, providing illumination and sustainability. However, like any other electrical device, they require regular maintenance to ensure optimal performance and longevity. In this section, we will explore the essential steps for maintaining and cleaning solar lights to keep them shining bright.
Let’s dive in!
Removing Dirt and Debris from Solar Panels:
- Inspect the solar panels for any dirt, dust, or leaves that may have accumulated on the surface.
- Gently brush off the debris using a soft-bristled brush or a microfiber cloth.
- Ensure that the solar panels are not scratched during the cleaning process, as this can affect their efficiency.
- Regularly clean the solar panels every few months to maintain their effectiveness.
Cleaning and Protecting the Solar Light Housing:
- Examine the housing of the solar light for any dirt, grime, or insect residue.
- Wipe the housing clean using a damp cloth or sponge, making sure to remove any stubborn stains.
- Avoid using harsh chemicals or abrasive cleaners, as they can damage the surface of the housing.
- Apply a thin layer of UV-resistant protectant or automotive wax to keep the housing looking new and protected from the elements.
Lubricating Moving Parts for Smooth Operation:
- Identify any moving parts, such as hinges or switches, that may require lubrication.
- Use a silicon-based lubricant or a light-duty machine oil to lubricate the moving components.
- Apply a small amount of lubricant to the moving parts and gently work it in to ensure smooth operation.
- Be cautious not to over-lubricate, as excessive lubrication can attract dirt and debris.
By following these simple steps, you can effectively maintain and clean your solar lights, prolonging their lifespan and ensuring they provide ample lighting for your outdoor space. Remember to regularly inspect and clean your solar panels, keep the housing clean and protected, and lubricate any moving parts for smooth operation.
With proper maintenance, your solar lights will continue to shine brightly and contribute to a more sustainable environment.
Choosing The Right Replacement Parts And Equipment
Repairing solar lights becomes easy when you choose the right replacement parts and equipment. Find out how to fix them efficiently and effectively.
Understanding Solar Light Specifications
- When repairing solar lights, understanding their specifications is crucial. Here are the key points you need to know:
- Solar Panel Wattage: The wattage of the solar panel determines the amount of sunlight it can convert into electricity. Check the specifications to ensure the replacement panel has the same or higher wattage for optimal performance.
- Battery Capacity: Solar lights rely on batteries to store the energy generated during the day. Look for replacement batteries with the same capacity as the original ones to maintain the desired runtime.
- Light Output: The lumens rating indicates the brightness of the solar light. Make sure to replace the LED bulb with one that matches the original lumens output to maintain consistent lighting levels.
- Operating Time: Solar lights have different operating times, indicating how long they can illuminate after a full charge. Pay attention to this specification when choosing replacement parts.
Selecting Appropriate Batteries For Solar Lights
- Selecting the right batteries for your solar lights is crucial for optimal functionality. Consider the following factors:
- Battery Type: Most solar lights use rechargeable batteries, such as Ni-MH (nickel-metal hydride) or Li-ion (lithium-ion). Ensure you choose batteries of the same type to maintain compatibility.
- Battery Capacity: The capacity of the battery determines how long the solar light can operate after a full charge. Look for replacement batteries with similar or higher capacities to ensure longer illumination periods.
- Voltage: Check the voltage requirement of your solar light and select batteries with the matching voltage. Using batteries with incorrect voltage may damage the light or decrease its performance.
- Durability: Opt for batteries that are designed to withstand outdoor conditions. Look for features like weather-resistant and long lifespan to ensure durability and longevity.
Sourcing Compatible LED bulbs
- When replacing LED bulbs in your solar lights, it’s essential to find compatible options. Consider the following factors:
- Bulb Type: Solar lights typically use LED bulbs due to their energy efficiency. Ensure you select LED bulbs as replacements, matching the original bulb’s specifications.
- Bulb Base Type: Different solar light models may have varying bulb base types, such as E27, E26, or GU10. Identify the correct base type of the original bulb and select replacements accordingly.
- Lumens Output: The lumens output determines the brightness of the LED bulb. Choose replacement bulbs with a similar lumens rating to maintain consistent illumination levels.
- Color Temperature: Solar lights may have different color temperatures for different purposes. Consider the desired lighting ambiance and choose replacement LED bulbs with the corresponding color temperature.
Remember to match the specifications of solar panels, batteries, and LED bulbs to ensure proper compatibility and optimal performance when repairing solar lights. Make informed choices based on wattage, capacity, voltage, and other key specifications. With the right replacement parts, you can bring your solar lights back to life and enjoy their renewable illumination.
‘Diy’ Solar Light Repair Techniques
Discover simple yet effective techniques for repairing solar lights on your own. This comprehensive guide provides step-by-step instructions to help you troubleshoot and fix your outdoor solar lights, ensuring they continue to shine bright all night long.
Diy Solar Light Repair Techniques
Solar lights are an eco-friendly and cost-effective way to illuminate your outdoor spaces. Over time, however, they may encounter some issues that can diminish their performance. Thankfully, several do-it-yourself (DIY) techniques can help you repair solar lights and get them shining brightly again.
In this section, we will explore three common DIY repair techniques: testing solar panel efficiency, resurrecting a dead battery, and fixing loose or broken wiring connections.
Testing Solar Panel Efficiency:
To ensure that your solar light is receiving optimal sunlight and functioning efficiently, here are a few steps you can take to test its solar panel efficiency:
- Place the solar light under direct sunlight for at least six hours.
- Check if the solar panel is clean and free from any dust or debris.
- Use a multimeter set to measure DC voltage to test the voltage output of the solar panel. It should provide a reading close to the manufacturer’s specifications.
- If the reading is significantly lower than expected, consider cleaning the panel or repositioning the light to maximize sun exposure.
Resurrecting A Dead Battery:
A dead or weak battery is a common issue faced by solar lights. To revive a dead battery and extend its lifespan, try the following techniques:
- Start by turning off the solar light and removing the battery.
- Clean the battery terminals using a cotton swab dipped in vinegar or lemon juice. This helps to remove any corrosion that may be preventing proper contact.
- Reinsert the battery and turn on the solar light to see if it powers up.
- If the battery is still dead, you may need to replace it with a new one. Be sure to choose a battery with the same specifications as the original.
Fixing Loose Or Broken Wiring Connections:
Wiring connections can become loose or broken over time, causing the solar light to malfunction. Here’s how you can fix these issues:
- Start by turning off the solar light and inspecting the wiring connections.
- If you notice any loose or disconnected wires, carefully reattach them, ensuring a secure and proper connection.
- In case of broken wires, you can use wire strippers to remove the damaged section and then connect the ends again.
- After reassembling the wiring, turn on the solar light to test if the connection is secure and the light functions properly.
By following these DIY repair techniques, you can bring back the functionality and effectiveness of your solar lights. Remember to prioritize safety when working with electrical components and consult a professional if you are unsure about any repairs. With a little effort and troubleshooting, you’ll be able to enjoy the benefits of well-lit outdoor spaces once again.
Seasonal Maintenance Tips To Optimize Solar Light Performance
Keep your solar lights performing optimally with these seasonal maintenance tips. Learn how to repair solar lights and ensure they are running smoothly year-round.
Solar lights are an eco-friendly way to illuminate your outdoor spaces, but like any other device, they require maintenance to ensure optimal performance. Seasonal maintenance plays a crucial role in keeping solar lights in top-notch condition. By following some simple tips, you can enhance their functionality and prolong their lifespan.
In this section, we will discuss three key aspects of seasonal maintenance to optimize solar light performance.
Preparing Solar Lights For Extreme Weather Conditions
Seasonal changes, especially extreme weather conditions, can have an impact on the performance of solar lights. By preparing them in advance, you can mitigate potential damage and ensure their longevity. Here are some tips to help you get started:
- Clean the solar panels: Remove any dust, debris, or dirt that may have accumulated on the solar panels. This will improve their ability to harness sunlight and convert it into electricity.
- Protect against moisture: Waterproof the solar lights by applying a sealant or silicone caulk around the edges. This will prevent water from seeping into the internal components and causing damage.
- Secure light fixtures: Ensure that the fixtures are tightly secured to prevent them from getting dislodged during strong winds or storms.
By taking these precautionary measures, you can safeguard your solar lights against inclement weather conditions and ensure their continued functionality.
Enhancing Solar Panel Exposure To Sunlight
The performance of solar lights significantly relies on the amount of sunlight they receive. To maximize their efficiency, it’s essential to enhance the exposure of solar panels to sunlight. Here are a few tips to achieve this:
- Clear obstructions: Trim nearby trees or shrubs that may cast shadows on the solar panels. This will allow more sunlight to reach the panels throughout the day.
- Regularly clean the panels: Wipe the surface of the solar panels with a soft cloth dampened with soapy water. This will remove any dirt or grime that might hinder the absorption of sunlight.
- Adjust panel angles: If possible, adjust the angle of the solar panels to align with the sun’s movement throughout the day. This will optimize their exposure and improve charging efficiency.
By implementing these steps, you can ensure that your solar panels capture the maximum amount of sunlight, resulting in improved performance.
Adjusting Photocells For Optimal Charging
Photocells are responsible for switching solar lights on and off based on the ambient light conditions. Proper adjustment of these photocells is crucial for optimal charging and lighting performance. Consider the following tips:
- Check the settings: Ensure that the photocells are set to the correct sensitivity level. This will enable them to accurately detect low-light conditions and trigger the lights to turn on.
- Remove external light sources: External light sources, such as streetlights or neighboring fixtures, may interfere with the functioning of the photocells. Position your solar lights away from these sources to prevent false triggering.
- Clean photocell surfaces: Dust, dirt, or debris can accumulate on the photocell surfaces over time, affecting their sensitivity. Clean them regularly to maintain their optimal performance.
By adjusting the photocells properly, you can ensure that your solar lights charge effectively during the day and provide reliable illumination throughout the night.
By following these seasonal maintenance tips, you can optimize the performance of your solar lights and prolong their lifespan. Taking proactive measures to prepare for extreme weather conditions, enhancing solar panel exposure to sunlight, and adjusting photocells for optimal charging will ensure that your solar lights continue to illuminate your outdoor spaces efficiently.
Upgrading And Enhancing Your Solar Light System
Upgrade and enhance your solar light system with these easy repair tips. Keep your lights shining bright and maximize their efficiency for longer-lasting illumination.
Solar lights are a convenient and eco-friendly way to add lighting to your outdoor spaces. Over time, however, these lights may start to lose their efficiency or functionality. Fortunately, there are ways to upgrade and enhance your solar light system.
In this section, we’ll explore three methods that can breathe new life into your solar lights.
Installing External Battery Packs For Extended Runtime
If you find that your solar lights don’t stay illuminated for as long as you’d like, installing external battery packs can provide a simple solution. With these packs, you can boost the runtime of your solar lights, ensuring that they stay bright throughout the night.
Here are a few key benefits of installing external battery packs:
- Longer runtime: External battery packs increase the overall capacity of your solar lights, allowing them to operate for extended periods.
- Easy installation: Most external battery packs are designed to be easily installed with your existing solar light system. Simply connect the pack to the solar light’s battery compartment.
- Improved charging capabilities: External battery packs often come with enhanced charging capabilities. This means that your solar lights can charge more efficiently and effectively.
Retrofitting Solar Lights With Motion Sensors
Want to enhance the functionality of your How to Repair Solar Lights while also conserving energy? Retrofitting your solar lights with motion sensors can achieve just that. Motion sensors activate the lights only when movement is detected, providing lighting when needed and conserving energy when not in use.
Here are some advantages of retrofitting solar lights with motion sensors:
- Increased energy efficiency: Motion sensors ensure that your solar lights only activate when motion is detected, reducing unnecessary power consumption.
- Enhanced security: With motion sensors, your solar lights become a deterrent to potential intruders, as they are more likely to be startled by sudden illumination.
- Extended lifespan: By reducing the amount of time your solar lights are active, retrofitting with motion sensors can prolong their lifespan, saving you money in the long run.
Exploring Wireless Connectivity And Remote Control Features
Taking your solar lights to the next level can mean exploring wireless connectivity and remote control features. This advancement allows you to control your solar lights remotely, providing convenient operation and customization options. Here’s why wireless connectivity and remote control can enhance your solar light system:
- Convenient operation: With wireless connectivity, you can control your solar lights from a distance, eliminating the need to physically adjust each light.
- Versatile customization: Remote control features enable you to change lighting modes, adjust brightness levels, and even set timers for your solar lights.
- Improved accessibility: Having wireless control over your solar lights makes it easier for individuals with mobility challenges to manage their outdoor lighting.
By upgrading and enhancing your solar light system through the installation of external battery packs, retrofitting with motion sensors, or exploring wireless connectivity and remote control features, you can ensure that your solar lights continue to provide efficient and reliable lighting for your outdoor spaces.
So don’t let your solar lights lose their shine – give them a new lease on life with these exciting enhancements.
Frequently Asked Questions On How To Repair Solar Lights
Can Solar Lights Be Repaired?
Solar lights can be repaired if there is a problem with their components or wiring.
How Do You Fix Solar Lights That Stopped Working?
To fix solar lights that stopped working, check the battery and replace it if necessary. Clean the solar panel and check the wiring connections.
Can You Replace the Battery in Solar Lights?
Yes, you can replace the battery in solar lights with a new one.
How Do You Fix a Broken Solar Light Wire?
To fix a broken solar light wire, first locate the damaged section. Then, carefully cut the wire and strip the insulation. Finally, reconnect the wire using waterproof connectors.
How do solar lights work?
Solar lights work by converting sunlight into electricity through a solar panel, which charges the rechargeable battery inside the light.
Conclusion
How to Repair Solar Lights is a manageable task that can save you both money and energy. By following the simple steps outlined in this blog post, you can troubleshoot and fix common issues with your solar lights. Start by checking the basics, such as ensuring the lights are receiving adequate sunlight and that the batteries are charged.
If those factors are not the problem, proceed to assess and repair any physical damage or faulty components. Remember to always prioritize safety by turning off the power source and handling electrical components with caution. With patience and a little DIY know-how, you can successfully maintain and repair your solar lights, prolonging their lifespan and maximizing their efficiency.
So, give it a try and enjoy the benefits of a well-lit, environmentally friendly outdoor space.

