How to Connect Solar Panel to Inverter: A Step-by-Step Guide
To connect a solar panel to an inverter, you need to use a solar charge controller to regulate the flow of energy from the panel to the inverter. The charge controller transforms the DC output of the panel into AC power that the inverter can use.
It is essential to follow the manufacturer’s instructions and ensure proper wiring and connections to ensure efficient and safe operation. Additionally, check for compatibility between the solar panel and the inverter to ensure optimal performance. Connecting a solar panel to an inverter involves using a solar charge controller to regulate energy flow.
This controller converts the panel’s DC output into AC power suitable for the inverter. When making these connections, it is crucial to follow the manufacturer’s guidelines and ensure correct wiring and connections for safe and efficient operation. It is also necessary to check compatibility between the solar panel and the inverter for optimal performance.
Differentiating Between Solar Panels And Inverters
Before understanding how to connect solar panels to an inverter, it is essential to differentiate between these two important components. Solar panels, also known as photovoltaic modules, are devices designed to convert sunlight into direct-current (DC) electricity. They consist of multiple interconnected solar cells that harness the sun’s energy and generate electrical power.
On the other hand, an inverter is essential to the solar energy system because it converts the DC electricity that the solar panels produce into alternating current (AC) electricity. This AC electricity is the standard type of electrical current used in our homes and businesses. In simple terms, solar panels harvest the sun’s energy, while inverters transform that energy into a usable form.
Components Needed For Connecting Solar Panels To The Inverter
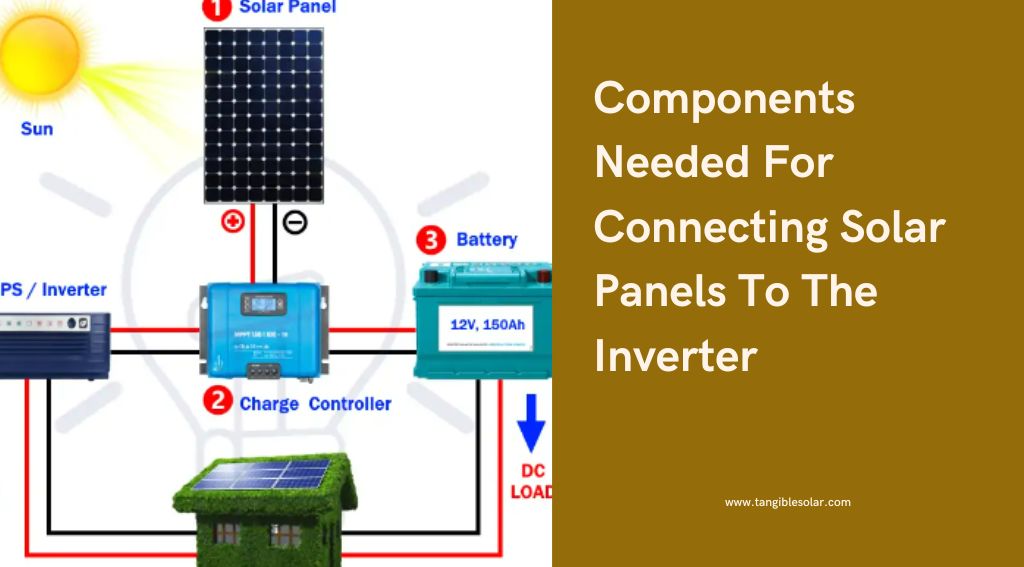
Connecting solar panels to an inverter requires a few essential components. These components ensure a seamless flow of energy from the panels to the inverter, allowing for efficient electricity conversion and usage. Here are the key components you need:
- Solar panels: high-quality solar panels capable of generating the desired amount of electricity based on your energy requirements
- Mounting hardware: a sturdy and secure mounting system that holds the solar panels in place, ensuring optimal exposure to sunlight.
- DC cables: These cables carry the DC electricity that the solar panels produce from the panels to the inverter.
- An inverter that is the right size and can handle the electrical load that the solar panels produce.
- AC cables: These cables connect the inverter to the electrical panel of your home or business, enabling the distribution of AC electricity.
- Disconnect switches: safety switches that allow you to disconnect the solar panels and inverter from the electrical system when needed.
How to Connect Solar Panel to Battery And Inverter Diagram
Importance Of Proper Connections For Optimal Solar Energy Conversion
Properly connecting the solar panels to the inverter is crucial for achieving optimal solar energy conversion. When the connections are not properly made, efficiency and performance issues may arise, resulting in decreased solar energy production and overall system performance.
By ensuring the correct and secure connections between the panels and the inverter, you can effectively maximize the amount of electricity generated by the solar panels. This translates into greater energy independence, reduced electricity bills, and a smaller carbon footprint for your home or business.
Moreover, proper connections also mitigate the risk of electrical hazards, ensuring the safety of both the solar energy system and the individuals operating or living on the property. Adhering to electrical code requirements and following manufacturer guidelines for connection is imperative to a successful and safe solar energy system.
Now that we have laid the groundwork by understanding the basics of connecting solar panels to inverters, let’s move on to the step-by-step process of making these connections.
How to Connect Solar Inverter to WiFi
Assessing Solar Panel Compatibility
Assessing solar panel compatibility is a crucial step when connecting solar panels to an inverter. It involves determining the voltage and power rating of your solar panels, checking if your inverter is compatible with your solar panel specifications, and understanding the concept of stringing and parallel connections.
Determining The Voltage And Power Rating Of Your Solar Panels
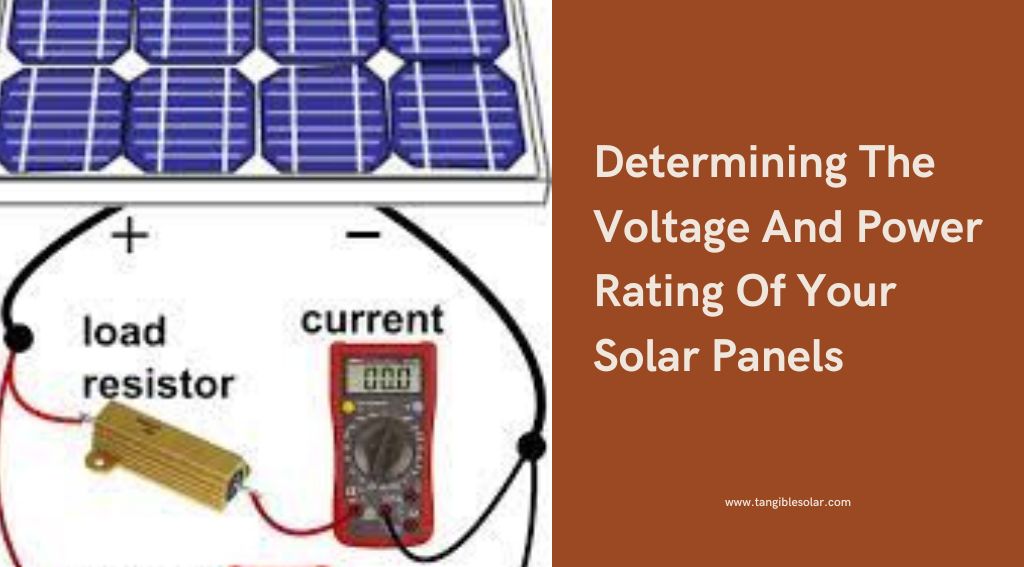
One of the first steps in assessing solar panel compatibility is to determine your panels’ voltage and power rating. This information is important as it ensures that the solar panels and inverter are compatible and can operate efficiently together.
To determine the voltage of your solar panels, you can refer to the manufacturer’s specifications or look for a label on the back of the panel. This label typically provides information about the panel’s maximum power point voltage (Vmpp) or open-circuit voltage (VOC). Both values can be used to assess compatibility.
Once you have determined the voltage, you need to consider the power rating of your solar panels. The power rating indicates the maximum power the panels can produce under standard test conditions. It is usually expressed in watts (W) and can be found on the manufacturer’s specifications or label.
Checking If Your Inverter Is Compatible With Your Solar Panel Specifications
After determining the voltage and power rating of your solar panels, the next step is to check if your inverter is compatible with these specifications. Inverters come with different input voltage and power rating limits, and it is essential to make sure that your solar panels fall within these limits.
You can find the input voltage and power rating limits of your inverter in the manufacturer’s specifications or user manual. Compare these limits with the voltage and power rating of your solar panels to ensure compatibility. If there is a mismatch, it can result in inefficient operation or even damage to the inverter.
Understanding The Concept Of Stringing And Parallel Connections
To optimize the performance of your solar system, it is important to understand the concepts of stringing and parallel connections. These configurations allow you to connect multiple solar panels together to achieve the desired voltage and power output.
In a string configuration, solar panels are connected in a series, where the positive terminal of one panel is connected to the negative terminal of the next panel. This increases the total voltage output of the solar array. On the other hand, in a parallel configuration, solar panels are connected with their positive terminals connected together and their negative terminals connected together. This increases the total current output of the solar array.
When stringing or parallel connecting multiple solar panels, it is crucial to ensure that each panel has the same voltage and power rating. This helps maintain the overall system balance and prevents issues such as uneven power distribution and reduced efficiency.
Planning For A Safe And Efficient Installation
When it comes to connecting solar panels to an inverter, proper planning is essential for a safe and efficient installation. By carefully evaluating the location for solar panel installation, ensuring proper grounding for safety, and considering the angle and orientation for maximum sunlight exposure, you can optimize your solar power system’s performance. Keep reading to discover the key factors to consider when planning your solar panel setup.
How to Connect Generator to Solar Inverter
Evaluating The Location For Solar Panel Installation
Choosing the right location for installing your solar panels is crucial to maximizing their efficiency. Here are a few factors to keep in mind:
- Unobstructed Sunlight: Place your solar panels in an area that receives ample sunlight throughout the day. Avoid any obstructions, such as trees or nearby buildings, that may cast shadows on your panels.
- Structural Integrity: Ensure that the installation location can support the weight of the solar panels and withstand any environmental challenges, such as wind, rain, or snow.
- Accessibility: Consider the accessibility of the location for maintenance and cleaning purposes. You should be able to reach the panels easily for periodic inspections and upkeep.
Ensuring Proper Grounding For Safety
Grounding your solar power system is crucial to protect against electrical faults and ensure the safety of your installation. Here’s what you need to know:
- Grounding Electrode System: Install a grounding electrode system to provide a low-resistance path for electrical faults to dissipate safely into the ground. This helps protect both your solar panels and your home’s electrical system.
- Compliance: Ensure that your grounding system adheres to the local electrical codes and regulations. It’s always advisable to consult with a professional electrician to ensure proper installation and compliance.
Considering The Angle And Orientation For Maximum Sunlight Exposure
The angle and orientation of your solar panels play a crucial role in optimizing their performance and capturing maximum sunlight. Take the following factors into account:
- Latitude and Climate: Determine the optimal tilt angle for your solar panels based on your latitude and local climate. This angle allows for better sunlight absorption and maximum energy production.
- Orientation: Orient your panels towards the south (in the Northern Hemisphere) or towards the north (in the Southern Hemisphere) to ensure they receive the most sunlight throughout the day.
Step-by-step Connection Process
Connecting solar panels to an inverter is a crucial step in setting up your solar power system. In this section, we will walk you through the step-by-step process of connecting solar panels to the inverter efficiently and securely.
Mounting The Solar Panels Securely
The first step in connecting the solar panels to the inverter is to mount them securely. Follow these steps to ensure proper mounting:
- Choose a suitable location on your roof or any other elevated surface where the solar panels can receive maximum sunlight.
- Use specialized brackets or mounts to securely attach the solar panels to the chosen location.
- Ensure that the solar panels are inclined at an optimum angle to maximize their exposure to sunlight.
- Check the mounting stability and ensure that the panels are well-secured and won’t be easily affected by extreme weather conditions.
Installing The Necessary Cables And Connectors
Once the solar panels are mounted securely, the next step is to install the necessary cables and connectors to connect the panels to the inverter. Follow these steps:
- Identify the positive (+) and negative (-) terminals on each solar panel.
- Connect the positive terminals of all the panels in parallel using the appropriate cables and connectors.
- Similarly, connect the negative terminals in parallel using the appropriate cables and connectors.
- Make sure to use high-quality cables and connectors suitable for outdoor use to minimize power loss and ensure efficient connectivity.
- Properly insulate and protect exposed cables and connectors using weatherproof materials to prevent any damage or electrical hazards.
Connecting Solar Panels To The Inverter Following Manufacturer’s Guidelines
Finally, the last step is to connect the solar panels to the inverter, following the manufacturer’s guidelines. Here is the process:
- Refer to the inverter’s user manual to identify the specific terminals dedicated to solar panel connections.
- Connect the positive cable from the solar panel to the positive terminal on the inverter.
- Repeat the same for the negative cable, connecting it to the negative terminal on the inverter.
- Double-check all the connections to ensure they are secure and correctly aligned with the manufacturer’s instructions.
- Power on the inverter and monitor the system to ensure it is working optimally.
By following these step-by-step instructions, you can successfully connect your solar panels to the inverter for an efficient and reliable solar power system.
Testing And Troubleshooting
Once you have successfully connected your solar panel to the inverter, testing, and troubleshooting become crucial steps to ensure proper functioning and optimal performance. This article will guide you through the process of verifying the connection, testing the solar panel output, identifying and resolving common connection issues, and seeking professional assistance for complex troubleshooting.
Verifying The Connection And Testing The Solar Panel Output
After connecting your solar panel to the inverter, it is essential to verify the connection to ensure everything is properly wired. Follow these steps to verify the connection:
- Check the wiring: inspect the cables and ensure they are securely connected to both the solar panel and the inverter. Check for any loose connections or damaged cables that may affect the performance.
- Inspect the terminal blocks: examine the terminal blocks on the solar panel and inverter. Make sure there are no loose screws or exposed wires that could lead to poor connectivity.
- Measure the voltage: Use a multimeter to measure the voltage at the connection point between the solar panel and the inverter. Compare the measured voltage with the expected voltage. If they match, it indicates a successful connection.
Once you have verified the connection, it’s time to test the solar panel output. Follow these steps:
- Place the solar panel in direct sunlight.
- Connect the multimeter to the output terminals of the solar panel.
- Monitor the multimeter reading, which should indicate the voltage and current generated by the solar panel.
- If the readings are within the expected range, it confirms that your solar panel is generating the desired output.
Identifying And Resolving Common Connection Issues
Even with a proper initial connection, it is not uncommon to encounter connection issues. Here are some of the most common issues you may come across:
| Common Connection Issues | Possible Causes | Resolution |
| Intermittent power output | Loose connections, damaged cables, or faulty solar panels | Tighten connections, replace damaged cables, or repair or replace faulty solar panels |
| No power output | Faulty wiring, blown fuses, or malfunctioning inverter | Double-check wiring, replace blown fuses or consult a professional to repair or replace the inverter |
| Low power output | Dirty solar panel surface, shading, or insufficient sunlight | Clean the solar panel surface, remove shading, or optimize the solar panel’s position for better sunlight exposure |
Seeking Professional Assistance For Complex Troubleshooting
Although verifying the connection and troubleshooting common issues can often be handled personally, some problems may require professional assistance. Experts who have the knowledge and experience to effectively resolve complex issues, such as inverter faults, sophisticated wiring issues, or technical malfunctions, should address them.
Always reach out to a qualified technician or solar panel installer when encountering intricate troubleshooting scenarios to avoid further complications or potential damage.
FAQs: How To Connect Solar Panel To Inverter
How Can I Use Solar Panels Directly Without a Battery?
Solar panels can be used without a battery by directly connecting them to the electrical system. Real-time use of the electricity the panels produce reduces reliance on the grid and lowers energy costs. This setup is ideal for daytime use when the sun is shining.
How do I connect a 24-volt solar panel to a 12-volt inverter?
To connect a 24V solar panel to a 12V inverter, you need a voltage step-down device like a charge controller. The charge controller will regulate the voltage and ensure compatibility between the solar panel and the inverter.
How do I connect solar panels to an inverter?
To connect solar panels to an inverter, you’ll need to follow a few steps. First, make sure your panels are generating power. Then, connect the wires from the panels to a combiner box. From there, connect the wires to the inverter’s input terminals.
Finally, connect the output terminals of the inverter to the main electrical panel to start using solar power.
Can I connect multiple solar panels to one inverter?
Yes, you can connect multiple solar panels to one inverter. To do this, you’ll need to connect all the positive wires from the panels together and all the negative wires together using combiner boxes. Then, connect these wires to the input terminals of the inverter.
This allows the inverter to convert the combined power from the panels into usable electricity.
Conclusion
In a nutshell, connecting solar panels to an inverter is a crucial step in harnessing clean energy. By following the step-by-step guide provided in this blog post, you can ensure an effective connection that maximizes the efficiency of your solar power system.
Remember to always prioritize safety and consult professionals if needed. So, go ahead and start enjoying the benefits of renewable energy while reducing your carbon footprint. Happy solar panel installation!